Windows 11 is Microsoft’s new desktop operating system, introducing new features and many visual changes. However, many users face issues since the operating system is still being tested.
Recently, many users have reported to us about the sound issues on Windows 11. Several users have reported having sound problems in Windows 11, such as no sound, distorted sound, etc. So, if you are experiencing sound problems while using Windows 11, you’ve reached the right place.
Windows 11 offers you a handful of options to configure, improve, reset, and manage the sound settings. You can review these settings to make appropriate audio-related changes on Windows 11.
How to Change Sound Settings on Windows to Improve Audio Quality
Hence, this article will share a few of the best methods to change the sound settings on Windows 11 to get better audio. These are the basic methods that will help you improve the audio quality of the operating system. Let’s check out.
1) Restart Your Computer
If you are experiencing problems like no sound or sound distortion, restart your computer. Most of the time, a restart can solve the problem, whether an operating system problem or an audio driver problem.
There are high chances of resolving the problem by doing a simple restart. So, make sure to restart your computer before making any further changes.
2) Reconnect the Audio Device

If you are experiencing sound problems after restarting, you must reconnect the audio devices. You will face a sound distortion issue if the audio jack is not fitted correctly.
The best way to resolve such an issue is by reconnecting the audio device. Turn off your PC and unplug/plugin the audio jack again to the correct port. This will most probably fix the sound problem.
3) Change the Output Sound device
If you have just plugged in a new headphone or speaker, and if Windows 11 is not detecting it, you need to change the output sound device manually.
Since Windows 11 is not entirely free from bugs, sometimes it can fail to detect a newly added sound device. To change the output sound device, follow some simple steps below.
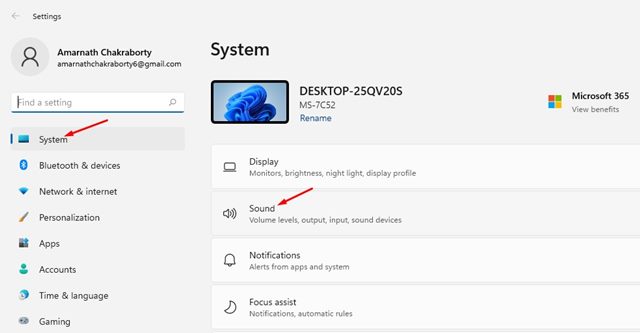
1. Click on the Windows 11 Start menu and select Settings.

2. On the Settings page, click on the System. Then, on the right, click on the Sound option.

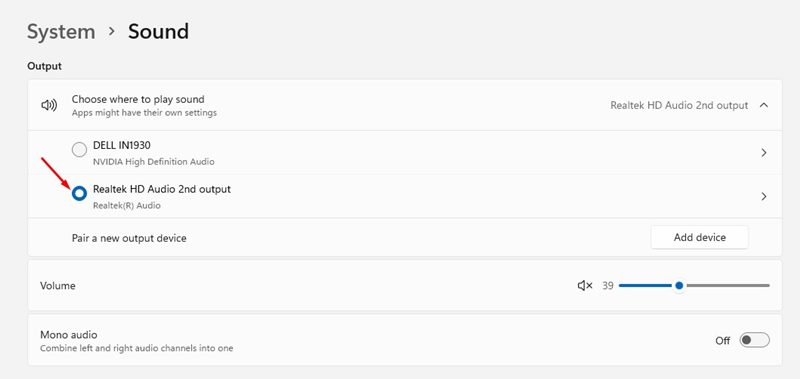
3. Under the output, select the new sound device you just plugged in.

That’s it! You are done. This will force Windows 11 to use the new sound device you have just plugged in.
4) Update the Audio Driver from the Device Manager
Updating the audio driver is an evergreen method to deal with many audio issue. If you are not satisfied or facing problems with the audio output, you should immediately update your audio drivers. Here’s what you need to do.
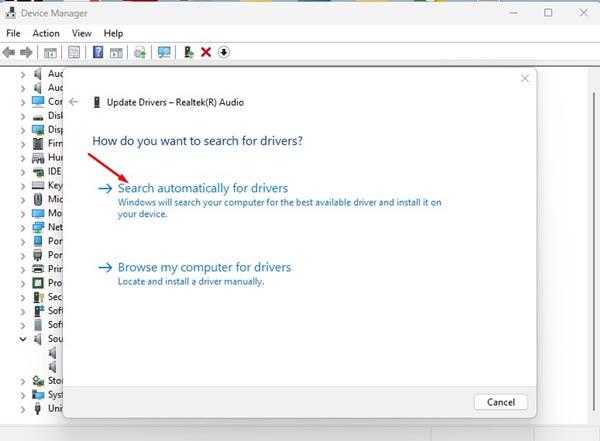
1. Type in Device Manager on the Windows 11 search and open it.

2. On the Device Manager, expand the Sound, video, and game controllers.

3. Right click on the audio driver and select Update driver.

4. On the next screen, select Search automatically for updated driver software.

That’s it! Now, Windows will automatically search for newer versions of the Audio driver and install it on your device.
5) Enable Spatial Sound
Windows 11 has a feature that lets you enable the Spatial Sound feature when you are using a Headphone. The spatial Sound feature gives an immersive audio experience that simulates a realistic environment. Here’s how to enable Spatial Sound in Windows 11.
1. Click on the Windows 11 Start menu and select Settings.

2. On the Settings page, select System > Sound.

3. On the Sound page, click the arrow button behind the Sound output device you use.

4. On the next page, scroll down and find the Spatial Sound option. Change its type to Windows Sonic for Headphones.

That’s it! You are done. This will enable Spatial audio on Windows 11, and you get an immersive sound experience.
6) Enable/Disable Enhanced Audio
The Audio Enhancement feature introduced on Windows 11 might be a gimmick for many, but it worked in my case. However, please note that enabling the Audio Enhancement on some PCs might make things even worse. So, it’s best to try enabling/disabling the Audio enhancement.
1. Click on the Windows 11 Start menu and select Settings.

2. On the Settings page, select System > Sound.

3. On the Sound page, click the arrow button behind the Sound output device you use.

4. Now scroll down and find the Enhance Audio section. You need to turn on/off the toggle button to enable or disable the Enhanced Audio feature.

That’s it! You are done. This will automatically improve the sound quality. However, if things get worse, you can disable the feature.
7) Enable or Disable the Mono Audio

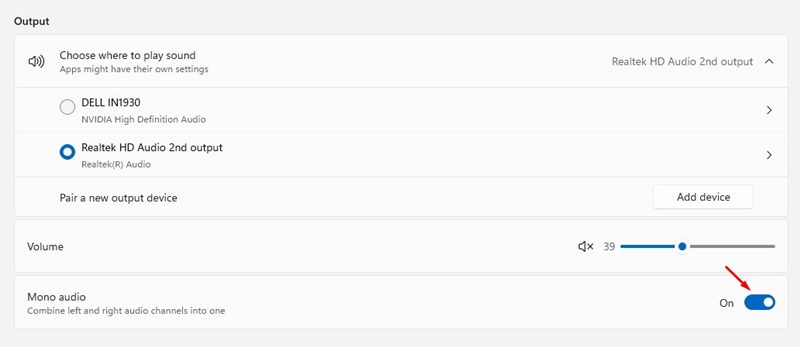
Well, Windows 11 also includes a feature called ‘Mono Audio’. Basically, the feature combines the left and right audio channels into one single channel. That means if you enable the mono audio, you can use just one earbud with your PC but still hear both the left & right audio tracks.
We have shared a detailed guide on enabling or disabling the Mono Audio on Windows 11. Read that article to know the benefits of enabling the Mono audio on Windows 10 and Windows 11.
8) Adjust the Left & Right Sound
If you face problems like one earbud being louder than the other, you might want to adjust the left & right sound manually. Windows 11 has a dedicated section for adjusting the sound output for both left and right channels. Here’s how to adjust the left & right sound channels in Windows 11.
1. Click on the Windows 11 Start menu and select Settings.

2. On the Settings page, select System > Sound.

3. On the Sound page, click the arrow button behind the Sound output device you use.

4. On the Output setting, drag the slider behind the left and right channels to adjust the volume.

That’s it! You are done. This is how you can adjust the left & right sound on the Windows 11 operating system.
9) Run the Audio Troubleshooter
If you are still facing sound-related problems, it’s best to run the Audio Troubleshooter. Windows Audio Troubleshooter can easily detect and fix various sound-related problems on your PC; here’s how to use it.
1. Click the Windows 11 search and type in Sound Settings.

2. On the Sound Settings page, scroll down and find the Advanced Section. Next, click on the Output devices beside the Troubleshoot common sound problems.

3. This will run the Windows Audio Troubleshooter. Now, you must wait a few seconds for the process to complete.

That’s it! You are done. This will fix most of the sound-related problems on Windows 11.
This is all about how to change sound settings on Windows 11 to improve the Audio. These methods will also help you fix various audio-related problems on your PC. I hope this article helped you! Please share it with your friends also. If you have any doubts related to this, let us know in the comment box below.
