
Related Articles


Pictures and photos remind us of certain special occasions with special people. The beauty of a picture is in its originality, clarity, and overall aesthetic appeal to the outside eye. However, there can be obstacles to providing a perfect picture, and one such is the presence of marks or blemishes. They reduce the appeal and sometimes make the picture look less polished than desired. These imperfections can result from various factors, such as environmental conditions, handling, or ageing.

Despite their origin, the quest for flawless pictures has led to the development of advanced photo editing tools and techniques. In this current era, photo editing software such as Photoshop and ZMO’s photo editor have become indispensable tools for enhancing and perfecting images. These tools empower users to remove marks, blemishes, or unwanted elements from their photos, restoring them to their intended beauty. Through the use of features like cloning, healing brushes, and advanced filters, one can meticulously refine and retouch images, ensuring a seamless and visually pleasing result. Isn’t that just wonderful?
Even though photo editing can help with flaws, it’s crucial to find a balance. Excessive editing can create an unnatural or fabricated image, separating the finished product from the reality of the original event. Maintaining the integrity of the collected scene is essential when utilising editing tools to improve, not distort, reality.
Now, let’s look at how to properly remove marks and blemishes from photos using Photoshop.
How To Remove Marks and Blemishes from Photos with Photoshop
There are three major ways of removing marks from photos using Photoshop, namely: the healing brush, the healing patch, and the spot healing brush. We will discuss them
The Healing Brush:
The Photoshop Healing Brush is a powerful tool within Adobe Photoshop that allows users to seamlessly remove imperfections, blemishes, and unwanted elements from digital images. This tool is particularly useful for retouching photographs and enhancing the overall visual appeal of pictures.
The Healing Brush works by sampling pixels from one area of an image and intelligently blending them with another, effectively “healing” or covering up undesired elements. There are two primary types of healing brushes in Photoshop: the spot healing brush and the regular healing brush. While the Spot Healing Brush is a quick and automatic way to remove small imperfections, such as dust spots, blemishes, and scratches, the Healing Brush Tool is more manual and provides greater control over the sampling and blending process. Let’s learn how they work.
Step 1:
You can use the Layers panel icon to start a new blank layer, or you can use the other way, which is to go to the menu and choose Layers > New Layer.

Step 2:
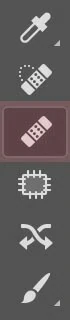
Locate the Healing Brush Tool by navigating to the toolbar. Be advised that it may be hidden under another therapeutic instrument. When that happens, click and hold until the menu shows up, then choose the Healing Brush symbol, as seen in the example below.
Step 3:
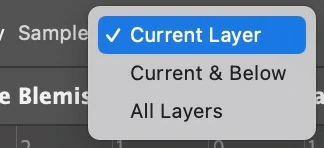
There’s an option on the top bar called “Sample.” Three more options will appear when you access its drop-down menu: “Current Layer,” “Current & Below,” and “All Layers.” Whichever option you choose—”Current & Below” or “All Layers”—should correspond to your unique needs.
Step 4:
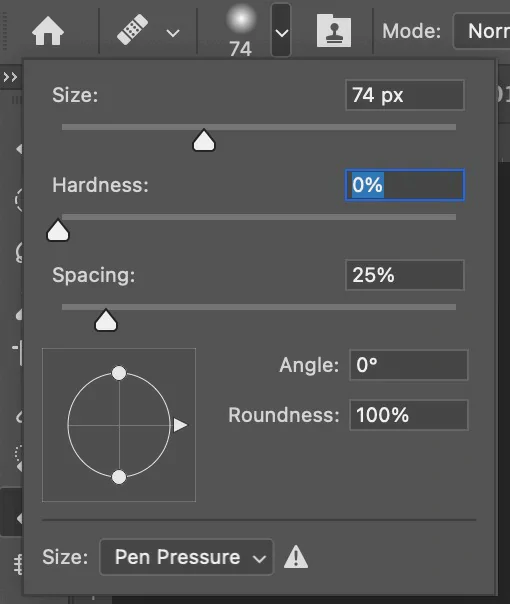
You can adjust the Healing Brush’s size and hardness characteristics using the buttons in the upper-left corner of the toolbar. I usually use a soft brush with a lower hardness percentage since the healing will be less obvious because the brush will blend in better with the surrounding area.
Step 5:
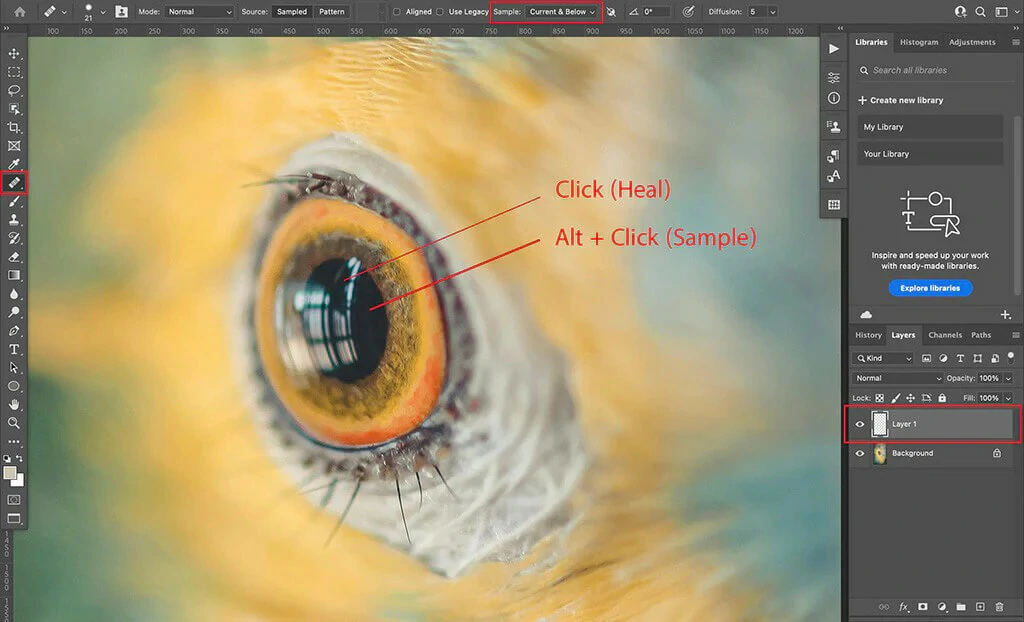
Click on the selected source point and hold down the Alt key (PC users) or the Option key (Mac users) to pick the sample region. Then, move the healing brush over the imperfection and click again to begin the mending process.
The Spot Healing Brush
The spot healing brush works very similarly to the healing brush, so the procedures are somewhat the same
The Healing Patch:
The healing patch tool is particularly useful when you need to retouch larger areas or remove complex objects. It offers a simple and intuitive way to make targeted adjustments to specific regions of your image. Here’s how to use it:
Step 1:
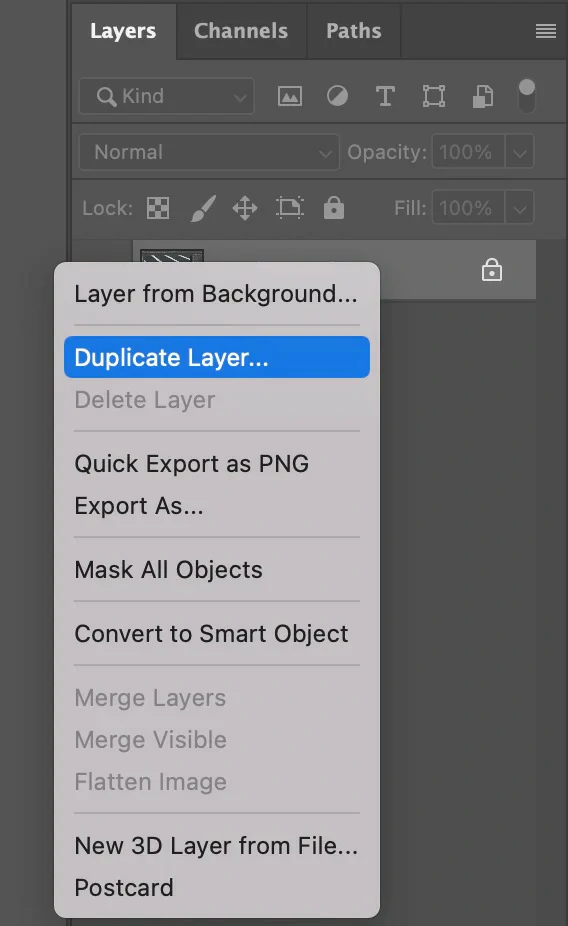
The Healing Patch tool cannot be used on an empty layer; it requires an existing layer to work. Therefore, it is advised to make a copy of the background layer in order to preserve the original image.
Just pick the background layer in the Layers Panel and drag it to the New Layer icon located at the bottom to make a duplicate of it. Also, you can use the keyboard shortcut CMD/CTRL+J to quickly duplicate. Alternatively, you might right-click on the background layer and choose “Duplicate Layer” from the menu that appears. By taking this care, non-destructive editing is significantly easier by ensuring that any changes performed with the Healing Patch tool do not directly affect the original image.
Step 2:
On the toolbar, find and select the Healing Patch Tool. If it’s not immediately apparent, it could be hidden underneath the healing tool that was previously in use. To use the Healing Patch Tool, just click and hold to bring up the menu, as seen below.

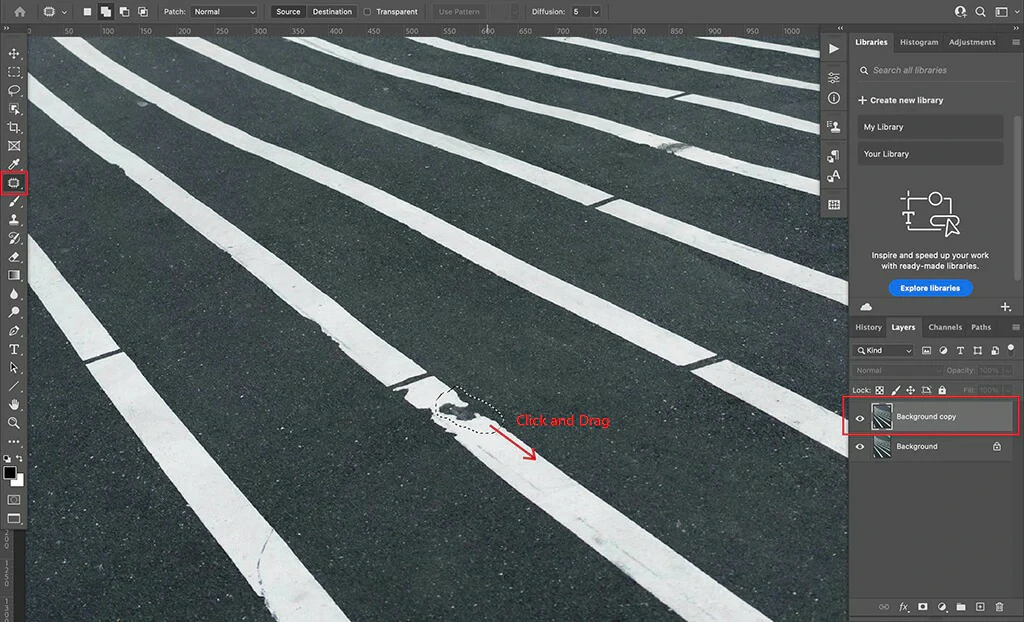
Step 3:
Click and drag the pointer around the defect you want to fix to choose the desired region.
Step 4:
In order to apply the healing patch, click on the selected region and drag it to a spot where there are no flaws so that Photoshop can collect the data needed for healing. Release the mouse button when you’re happy with the outcome and the flaw’s successful concealment—the tool comes with a live preview by default.
How To Remove Marks and Blemishes from Photos with ZMO
ZMO is a dependable method for efficiently eliminating imperfections and marks, guaranteeing that our images capture the desired clarity and attractiveness. This tutorial will show you how to use ZMO to easily remove flaws from images, giving you the ability to turn the moments you took into polished, eye-catching pieces of visual art.
Let’s begin:
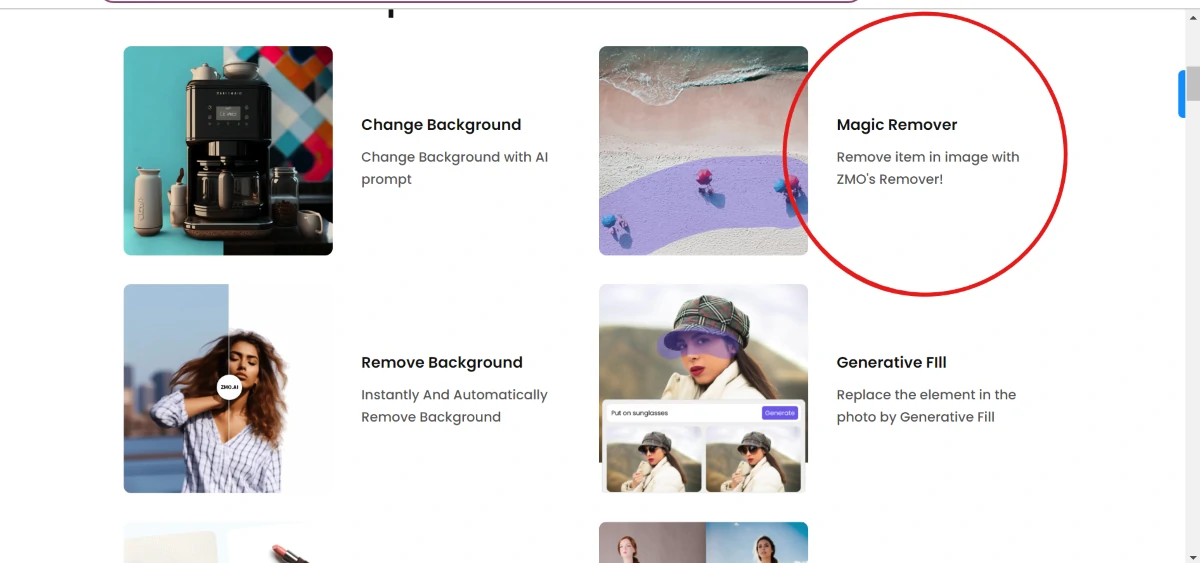
Step 1:
Go on to ZMO’s photo editor page, scroll down, and choose “Magic Remover.” Alternatively, you can easily go straight to the magic remover work space.
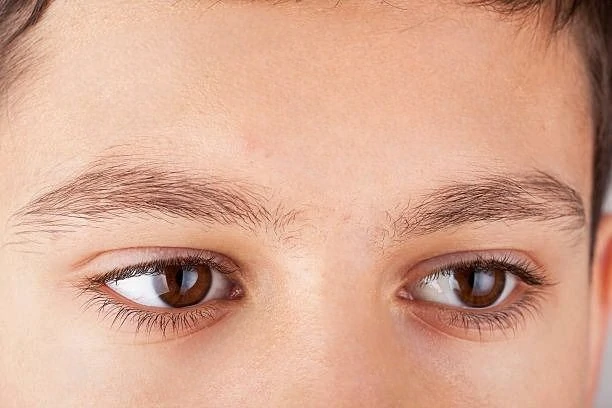
Step 2:
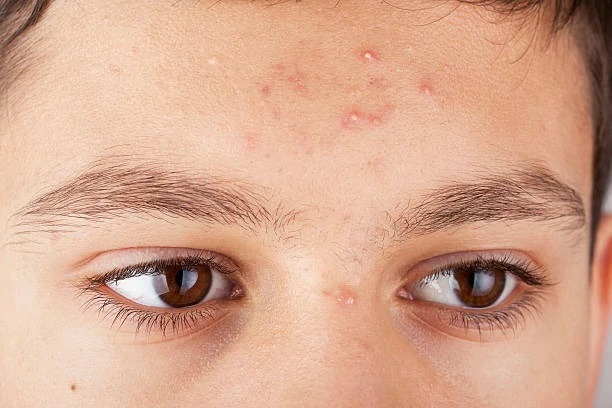
Upload your picture. Ours will be the photo below:
After uploading the picture, it should appear like this:
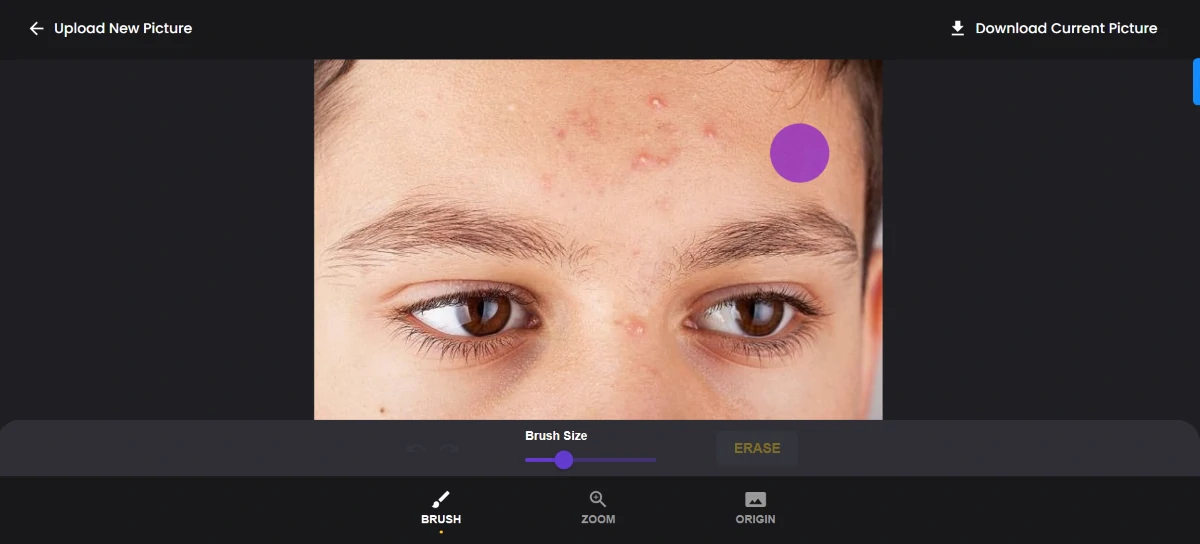
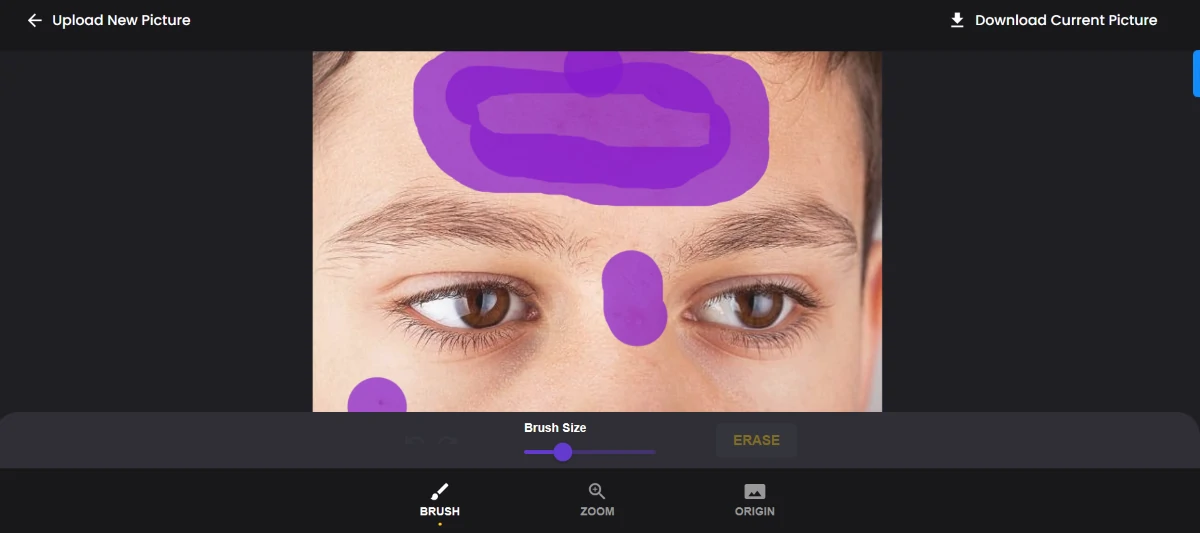
Step 3:
The next step is to choose your brush size, highlight the areas you want to remove, and click the “ERASE” icon. After doing so, it should appear like this:
Step 4:
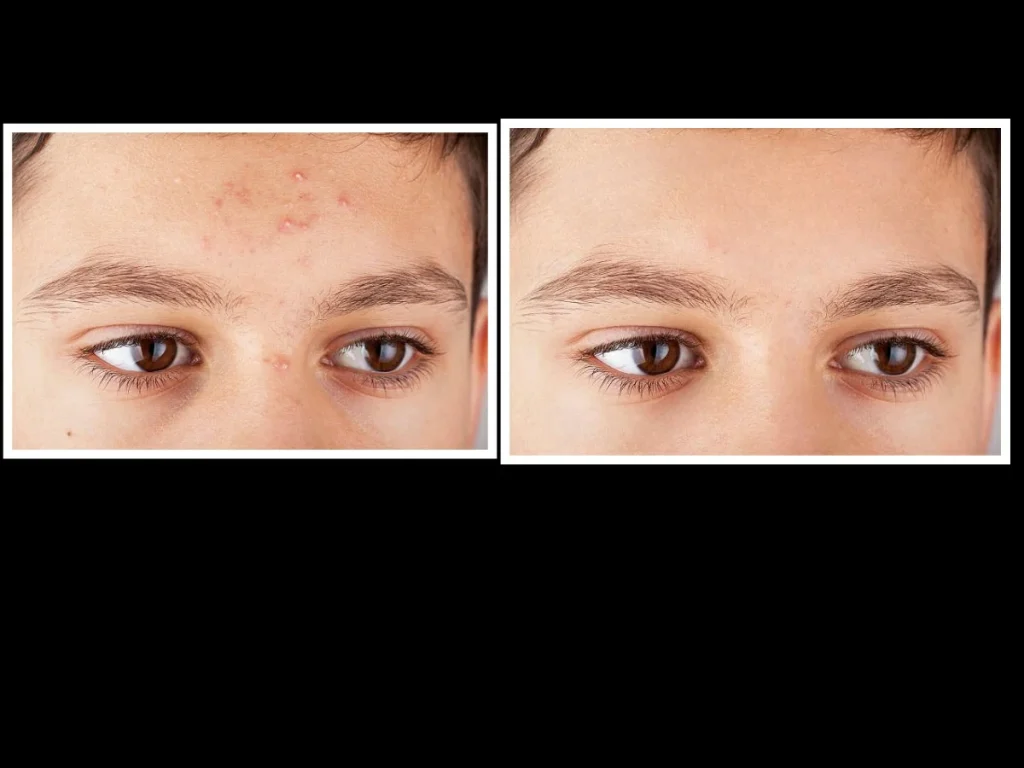
After the AI mark remover executes its function, the next step is to download the picture too your personal space or export it to your desired location. It should look like this:
There you have it. ZMO continues to be outstanding in its services., maintaining top-notch quality and producing photos with the best resolution.
Side-by-side Comparison:
Comparison Between Photoshop and ZMO Photo Editor
Photoshop and ZMO both provide strong solutions for manual and AI mark removal, but they use different techniques and provide different user experiences.
Adobe Photoshop, the industry behemoth, offers an extensive toolkit that includes the healing brush, the healing patch, and the spot healing brush. With the help of these tools, users may remove blemishes manually and with precision, giving them complete control over the editing process. The healing patch expands its capabilities even more, making it ideal for covering larger areas.
ZMO, on the other hand, offers a simplified and intuitive substitute. With the help of the Magic Remover tool, users of various skill levels can easily remove blemishes from their skin. ZMO’s insistence on minimalism doesn’t lessen its potency. Users may quickly and easily erase marks and defects with a few clicks, making the process quick and simple.
Photoshop is still the most versatile programme available, but ZMO is particularly user-friendly, which makes it a great option for anybody looking for quick and easy ways to improve and polish their photos.
In the end, the user’s desire for sophisticated features above user-friendly simplicity in their quest for perfect photos will determine which option they choose between the two.
Conclusion
ZMO’s Magic Remover and Photoshop’s Healing Brush tools revolutionise image enhancement in the field of photo perfection. Photoshop creates amazing visual effects, from precise blemish erasing with the Healing Brush to quick imperfection removal with the Spot Healing Brush. In the meantime, pictures are transformed with ease by ZMO’s captivating Magic Remover, revealing crystal-clear clarity. When used in tandem, these techniques create a digital canvas on which flaws vanish and memorable moments are showcased with classic elegance. Learn the skill of digital editing so that your images may tell engrossing stories while maintaining their timeless beauty.
