Last Updated on September 5, 2023 by Larious
Summarize this content to 100 words
Google Docs is widely recognized for its large collection of features and its ease of use. One often-overlooked feature is the ability to insert Word art, which is quietly nested in the drawing tool.
This free Word art tool lets you turn a regular document into a more visually appealing piece. Here’s where you can find this somewhat-hidden Drive feature and how to use it.
How to Create and Insert Word Art in Google Docs
You can only insert Word art in the web version of Google Docs and not the mobile app. Open Google Docs in your browser and then create a new document or open the document you want to insert the Word art in.
Click the Insert option in the menu bar.
Hover your cursor over the Drawing option in the dropdown menu and then select New from the sub-menu.
The Drawing window will appear. You’ll see a checkerboard which you can draw on, as well as several options in the header menu. Click Actions and then select Word art from the menu.
Next, enter the text that you want to turn into Word art in the text box that appears. You can add multiple lines by pressing Shift + Enter. When you’re ready to save, press Enter.
Your text will now appear on the checkerboard as Word art. You can then customize it using the options in the header menu, like changing its color, border weight, and so on. Click Save and Close once you’re finished customizing the Word art.
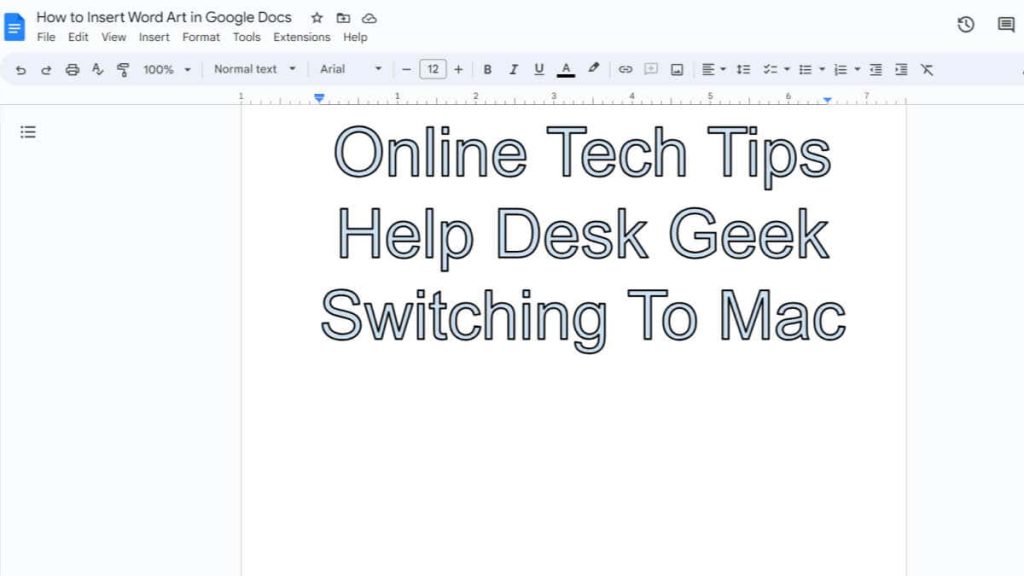
The Word art will then be inserted in the Google Docs document.
Aligning Word Art With Your Text
The way your Word art interacts with surrounding text can be a bit tricky, and may sometimes cause an undesirable layout shift. There are a few options available for positioning the Word art with your text.
In line: This option is the default option and makes the Word art behave the same as a character written in the text. It sits directly on the line of the text.
Wrap text: This allows your text to wrap around the Word art. In other words, the Word art remains in place while the surrounding text adjusts to it.
Break text: This makes your Word art essentially act as a barrier in your document.The text will stop above the Word art and continue below it.
Behind text: This places the Word art behind your text. This is a good idea for art such as a watermark. Be sure there’s enough contrast between the Word art and text, though.
In front of text: This places the Word art in front of your text.
You can find these options in the menu that appears when you click the Word art in your document.
Choosing the right wrapping option can have a big impact on the visual implications of the document, so choose carefully.
Bring Visual Potential to Your Document
Google Docs, aside from its many other features, offers creative potential with Word art. This allows users to transform ordinary text into a visual element, drawing attention to important details when necessary.
The available wrapping options also allow you to place your Word art appropriately while keeping in mind the content of the document.
Google Docs is widely recognized for its large collection of features and its ease of use. One often-overlooked feature is the ability to insert Word art, which is quietly nested in the drawing tool.
This free Word art tool lets you turn a regular document into a more visually appealing piece. Here’s where you can find this somewhat-hidden Drive feature and how to use it.

How to Create and Insert Word Art in Google Docs
You can only insert Word art in the web version of Google Docs and not the mobile app. Open Google Docs in your browser and then create a new document or open the document you want to insert the Word art in.
- Click the Insert option in the menu bar.
- Hover your cursor over the Drawing option in the dropdown menu and then select New from the sub-menu.

- The Drawing window will appear. You’ll see a checkerboard which you can draw on, as well as several options in the header menu. Click Actions and then select Word art from the menu.

- Next, enter the text that you want to turn into Word art in the text box that appears. You can add multiple lines by pressing Shift + Enter. When you’re ready to save, press Enter.

- Your text will now appear on the checkerboard as Word art. You can then customize it using the options in the header menu, like changing its color, border weight, and so on. Click Save and Close once you’re finished customizing the Word art.

The Word art will then be inserted in the Google Docs document.
Aligning Word Art With Your Text
The way your Word art interacts with surrounding text can be a bit tricky, and may sometimes cause an undesirable layout shift. There are a few options available for positioning the Word art with your text.
- In line: This option is the default option and makes the Word art behave the same as a character written in the text. It sits directly on the line of the text.
- Wrap text: This allows your text to wrap around the Word art. In other words, the Word art remains in place while the surrounding text adjusts to it.
- Break text: This makes your Word art essentially act as a barrier in your document.The text will stop above the Word art and continue below it.
- Behind text: This places the Word art behind your text. This is a good idea for art such as a watermark. Be sure there’s enough contrast between the Word art and text, though.
- In front of text: This places the Word art in front of your text.
You can find these options in the menu that appears when you click the Word art in your document.

Choosing the right wrapping option can have a big impact on the visual implications of the document, so choose carefully.
Bring Visual Potential to Your Document
Google Docs, aside from its many other features, offers creative potential with Word art. This allows users to transform ordinary text into a visual element, drawing attention to important details when necessary.
The available wrapping options also allow you to place your Word art appropriately while keeping in mind the content of the document.
conclusion
Google Docs is widely recognized for its large collection of features and its ease of use. One often-overlooked feature is the ability to insert Word art, which is quietly nested in the drawing tool.
This free Word art tool lets you turn a regular document into a more visually appealing piece. Here’s where you can find this somewhat-hidden Drive feature and how to use it.
How to Create and Insert Word Art in Google Docs
You can only insert Word art in the web version of Google Docs and not the mobile app. Open Google Docs in your browser and then create a new document or open the document you want to insert the Word art in.
- Click the Insert option in the menu bar.
- Hover your cursor over the Drawing option in the dropdown menu and then select New from the sub-menu.
- The Drawing window will appear. You’ll see a checkerboard which you can draw on, as well as several options in the header menu. Click Actions and then select Word art from the menu.
- Next, enter the text that you want to turn into Word art in the text box that appears. You can add multiple lines by pressing Shift + Enter. When you’re ready to save, press Enter.
- Your text will now appear on the checkerboard as Word art. You can then customize it using the options in the header menu, like changing its color, border weight, and so on. Click Save and Close once you’re finished customizing the Word art.
The Word art will then be inserted in the Google Docs document.
Aligning Word Art With Your Text
The way your Word art interacts with surrounding text can be a bit tricky, and may sometimes cause an undesirable layout shift. There are a few options available for positioning the Word art with your text.
- In line: This option is the default option and makes the Word art behave the same as a character written in the text. It sits directly on the line of the text.
- Wrap text: This allows your text to wrap around the Word art. In other words, the Word art remains in place while the surrounding text adjusts to it.
- Break text: This makes your Word art essentially act as a barrier in your document.The text will stop above the Word art and continue below it.
- Behind text: This places the Word art behind your text. This is a good idea for art such as a watermark. Be sure there’s enough contrast between the Word art and text, though.
- In front of text: This places the Word art in front of your text.
You can find these options in the menu that appears when you click the Word art in your document.
Choosing the right wrapping option can have a big impact on the visual implications of the document, so choose carefully.
Bring Visual Potential to Your Document
Google Docs, aside from its many other features, offers creative potential with Word art. This allows users to transform ordinary text into a visual element, drawing attention to important details when necessary.
The available wrapping options also allow you to place your Word art appropriately while keeping in mind the content of the document.