If you haven’t been living on Mars, you probably already know how important it is to have compelling product photographs in the current, extremely competitive internet market. Catching customers’ attention right away matters most at a time when they are swamped with options. Here’s where edit product photos becomes important, and getting it right may make all the difference in the world for your brand’s success.
The good news is that we have access to a wide range of tools and methods in the digital age that may help us take our product photography to the next level. ZMO, a powerful photo-editing program made especially for improving product photos, is one such tool. ZMO gives companies the tools they need to produce eye-catching graphics that grab viewers’ attention and inspire sales.
We’ll walk you through the entire ZMO Edit Product Photos process in this in-depth tutorial. This article will help you present your products in the best possible light, whether you’re an experienced photographer trying to hone your craft or a young entrepreneur hoping to make waves in the e-commerce industry.
We’ll cover everything, from simple editing chores like altering brightness and contrast to more complex ones like color correction and background removal. After reading this, you should be able to confidently and skillfully turn your product images into eye-catching visual assets that grab the attention of your target audience and stand out among the digital clutter. Let’s now dig in and unleash the complete potential of your product photography with ZMO.
Product Photography With ZMO
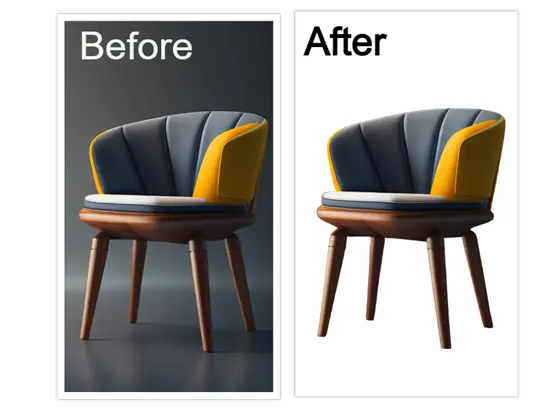
ZMO is an innovative photo editing tool with many state-of-the-art capabilities that make product photography easier. Its AI product backdrop removal tool, which uses sophisticated AI algorithms to remove the subject from its background with ease, is one of its most notable features. With a few clicks, users can easily isolate their products, removing distracting backdrops and making sure they take center stage in the final photograph.
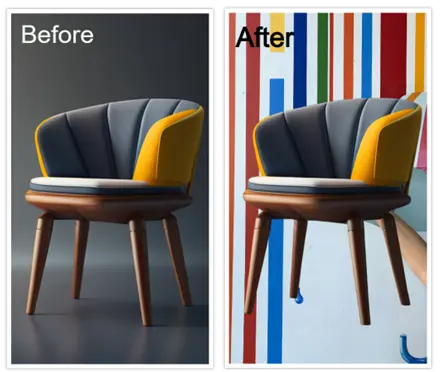
ZMO also provides a background changer for products, which lets consumers swap out the background for a number of configurable options. With this feature, users may customize the backdrop to match their branding or aesthetic preferences, whether it’s a solid color, a dynamic pattern, or a picturesque scenery. This improves the product’s overall visual appeal.
ZMO’s magic removal tool, which lets users easily erase undesired objects or flaws from their images, is another amazing feature. This tool makes it simple to obtain a perfect, polished finish, regardless of the unpleasant object in the backdrop or an unsightly mark on a product.
Moreover, ZMO’s generative fill function elevates Edit Product Photos by enabling users to smoothly add new features to their images. With this tool, users can unleash their creativity and take their product photography to new levels by adding missing props to shots or adding extra items to improve compositions.

Lastly, customers can resize their photographs to satisfy certain specifications without sacrificing quality, thanks to ZMO’s image resizing tool. This application makes sure your product photos always look their best, no matter where they’re presented, whether it’s for e-commerce platforms, social media posts, or print materials.
ZMO offers a broad range of solutions made specifically for product photography, addressing common problems faced by both companies and photographers. With ZMO, customers can create visually striking product photos that grab attention, promote conversation, and ultimately boost sales. This is accomplished by providing advanced editing capabilities like generative fill and magic removal, as well as by simplifying the backdrop removal and change procedure. With ZMO, taking Edit Product Photos to a high standard has never been simpler.
How To Edit Product Photos With ZMO: A Step-by-Step Guide

Using these methods will let you use ZMO to produce stunning, lifelike Edit Product Photos that will increase sales and consumer interaction.
Step 1: Take Product Photos or Import Your Images:
Launch the ZMO photo editor website. Click on the “Try AI photo editor with a free trial” button to proceed.

Next, import the product images you wish to edit. You can do this by clicking on the “Import” button or dragging and dropping your files into the application. Organize your images into folders for easier navigation.

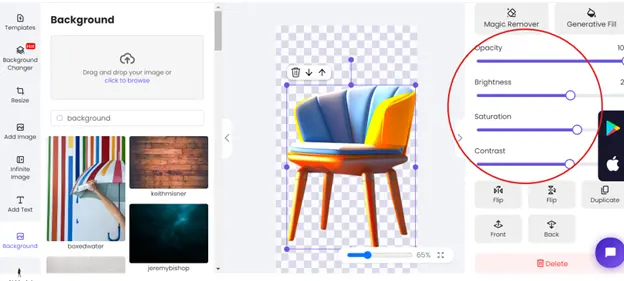
Step 2: Adjust Basic Settings:
Once your image has been imported, it should look something like this:

You can adjust basic settings such as opacity, contrast, brightness, and saturation. Use ZMO’s intuitive sliders or manual adjustment tools to achieve the desired look for your product photos. Pay close attention to maintaining accurate colors and exposure levels.
Step 3: Crop and Straighten:
Next, crop your images to remove any unwanted elements and ensure a clean composition. Use the crop tool to resize and straighten your product photos, focusing on highlighting the key features of your products.
Consider using the rule of thirds, which involves dividing an image into nine equal parts using two horizontal and two vertical lines, resulting in a grid with nine equally sized rectangles. The key elements of interest in the scene are then placed along these lines or at their intersections, rather than at the center of the frame.
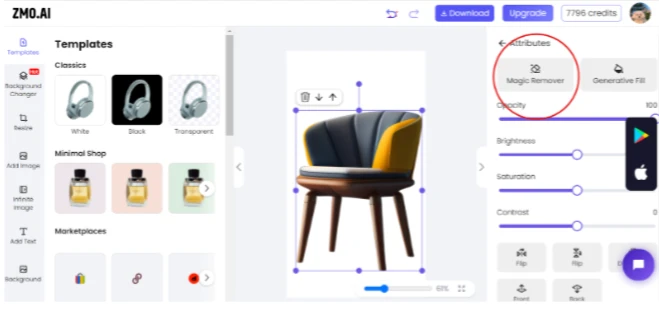
Step 4: Retouching:
Now it’s time to tackle any imperfections in your product photos. Use ZMO’s magic remover to remove blemishes, dust, or scratches from your images.
We can also use ZMO’s generative fill tool to add items to our image. Let’s add a white cat, for instance. All we have to do is click on the “Generative Fill” option on the dashboard and add our requirement—in our case, a white cat.

Here’s our result:

Make sure to pay attention to details such as wrinkles, smudges, or reflections that may distract from the main subject. Aim for a flawless finish while maintaining a natural look.
Step 5: Background Removal:
For product images with distracting backgrounds, consider removing or replacing them to create a clean, professional look. ZMO offers advanced background removal tools that allow you to isolate your products seamlessly.
Additionally, ZMO provides a sophisticated background-changing tool that makes it simple to alter the background of your products.
Experiment with different background options or create a transparent background for versatile use across various platforms.
Step 6: Enhance Details:
To make your products stand out, enhance their details and textures using ZMO’s sharpening and clarity tools. Adjust the sharpness and clarity settings to emphasize fine details and textures, making your products appear more lifelike and appealing to potential customers.
Step 7: Color Correction:
Achieve consistency across your product photos by fine-tuning the colors and tones using ZMO’s color correction tools. Adjust the white balance, tint, and color temperature to ensure accurate and vibrant colors that represent your products faithfully. Pay attention to color accuracy, especially for products with specific color variations.
Step 8: Add Effects (Optional):
Depending on your brand aesthetic and the style of your products, you may choose to add creative effects or filters to enhance your images further. Experiment with ZMO’s range of effects, such as vignetting, blur, or filters, to add depth and visual interest to your product photos. However, exercise restraint to avoid overwhelming the main subject.
Step 9: Save and Export:
Once you’re satisfied with the edits, save your edited product photos in the desired format and resolution. ZMO offers various export options, including JPEG, PNG, and TIFF, allowing you to optimize your images for different platforms and purposes. Choose the appropriate settings to maintain image quality while minimizing file size.

Step 10: Review and Iterate:
Finally, take a moment to review your edited product photos and make any necessary adjustments. Compare them with the original images to ensure that you’ve achieved your desired outcome. Don’t hesitate to iterate and refine your edits until you’re fully satisfied with the results.
By following these steps, you can master the art of editing product photos with ZMO, elevating your online presence, and driving sales through visually compelling imagery. Experiment with different techniques and features to discover your unique editing style and create stunning product photos that captivate your audience.
Conclusion
In the fiercely competitive online market, captivating Edit Product Photos is indispensable. ZMO emerges as the ultimate solution, offering a wealth of tools to elevate your visuals. Utilizing ZMO’s advanced features like background removal and color correction, your product images can transcend the ordinary, captivating audiences and driving sales. ZMO enables you to create memorable stories, regardless of your level of experience as a photographer or an entrepreneur. Improving looks isn’t the only thing to do; you also need to create genuine engagement and grow your brand to new heights. Use ZMO to maximize the potential of Edit Product Photos right now.